
Mounting solar panels on a shipping container can be a practical solution for mobile or remote power needs. Below are the general steps and considerations for mounting solar panels on a shipping container, specifically for the models LZY-MSC1 and LZY-MSC3:
LZY-MSC1 (Internal Folding Solar Panels):
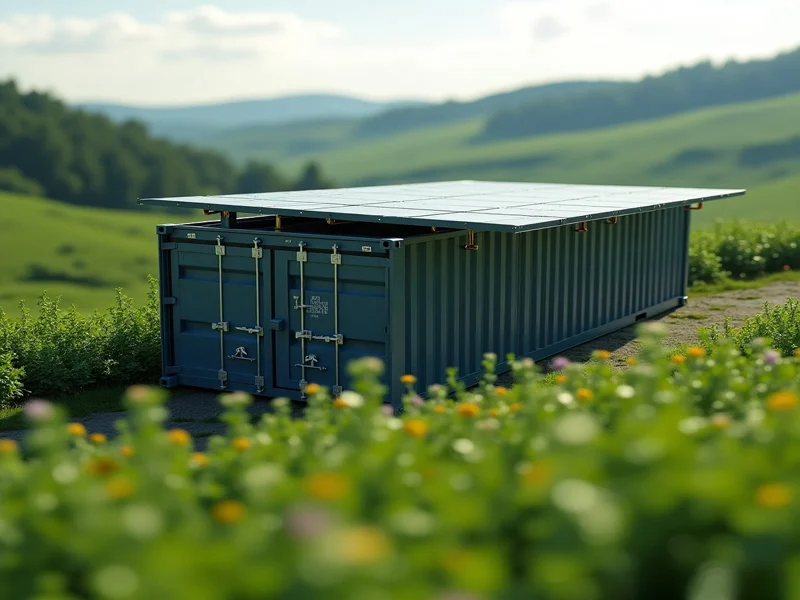
Now, a work of art, the LZY-MSC1 Internal Folding Solar Panel Container, presents a very ingenious way of putting solar energy working in conjunction with a shipping container. It employs an intelligent internal folding mechanism for easy, quick transport and deployment, solar panels being unfolded at the need and folded back anytime not used or while in transport. This is therefore an excellent choice for remote or temporary power needs.
1. Preparation:
Required Tools: Silicons for lubrication, expanding foam or sealant, galvanic paint or zinc powder, all types of screwdrivers, Allen keys, spanner, socket/spanner, torque wrench, zip ties, crimping tool, and 2 jacks with 2 channel beams.
Safety gear: Use PPE safety helmets, safety shoes, and gloves.
2. Installation Steps:
Step 1. Container Installation
Smooth surface and hard floor with a horizontal error up to 3°. Hoist the container onto the truck with cranes whose lift capacity is at least 25 tons. Secured a container at lower speed to avoid damages.
Step 2. Open the container & unpack.
Open the front/side doors and check that the inverter is in good condition and attached. The frames are vertical with regards to their storage, the wheels lying above the internal tracks. Unstrap and remove the triangular wooden stoppers, afterwards remove the tracks and supports.
Step 3. Install the Tracks
The support base is first built onto the track support. Transfer tracks should be placed next to the container in a level position. Be flat-everything you track and secure it with ends.
Unfold All The Frames
Remove the latch on the PV solar frame group and position the jacking square pipes. Use jacks to lift the frame group and allow wheels to fall onto the tracks. Do not unlock and fulfill each frame with wheels unless safety latches are removed before unfolding the next.
Step 4. Electrics
The above procedure is run once PV DC has been passed through the cable hole and into the container.
Consider putting down ground-fixed nails for stabilization if there are high winds.
Slowly unfold each frame, ensuring that safety latches are released before unfolding the next frame.
Step 5. Connect Power
Run the DC cable of the PV through the cable hole to the container.
Consider putting down ground fixed nails for stabilization if there are high winds.
For LZY-MSC3 (Bolted Top/Side Solar Panels):
This LZY-MSC3 Bolted Solar Panel Container: It is designed to last as well as very efficiently power equipment with solar panels totally secured mounted on top or on the sides using heavy bolted systems. In an application with the construction site or emergency response, power supplied is a very reliable source of power.
1. Preparation:
Tools Required: Same tools as LZY-MSC1, plus tools for bolting and electrical connections.
Safety Gear: Same PPE as above.
2. Installation Steps:
Step 1: Container Preparation
Ensure the site stabilization and the horizontal plane on which the container rests.
Top and sides where panels are to be mounted cleaned before a safe connection is made.
Step 2: Mounting of Panels
For top-mount type panels, position and bolt in place with reference to the predrilled holes.
For side-mount type panels, attach brackets to the container walls by bolting and mount the panels onto these brackets.
All glaringly obvious, those panels should now be skewed for maximum sun exposure.
Step 3: Wiring
Connect the solar panels to the inverter and the electrical cabinet according to the manufacturer's instructions. Use the suitably rated connectors and wires. Make sure all fittings and connections are taken care of, insulated, and secured.
Step 4: Final Checks
Check that all connections are tight, all mounts are fixed, and so on. After this, test the system for proper functioning.
General Tips:
- Reference the Manuals: Always assess the proper product manual for the product for step-by-step instructions and safe working procedures.
- Professional Help Required: Get the installers or technicians who understand the dense installation of solar panels.
- Regular Maintenance: Regular checks and maintenance of the system should be carried out after installation to ensure efficiency and safety.
These are heroic feats in support of both models for mounting solar panels on a shipping container, thus providing reliable and definitely a bonafide source of power.